Preamble
Minecraft is a bit notorious for being difficult to mod, given there’s oodles of different modloaders and versions to work with, there’s edge cases galore.
If you’re new to the Minecraft modding scene and you’d like to know more about each modding platform and how they differ, check out this post here.
0. Create a new Minecraft Java Instance in AMP
Easy as that, press the Create Instance button, then select Minecraft Java Edition from the drop-down. Feel free to use an existing instance as well if you already sorta know what you’re doing (sometimes things are easier with a blank slate).
In recent AMP versions, there’s a Store tab that’s in beta. This was created to make it easier to install modpacks and plugins from a few different sources. Try finding your desired mods in the Store first before continuing with the guide. If it fails to work, you can reach out to support or continue with the steps below.

1. CurseForge
Just as a general note, do not try and upload the client manifest zip or the “server pack” from the CurseForge launcher, as that is seemingly busted.
1.1. Finding and Importing the Server Pack Zip into AMP
Thank @Greelan for this bit, I forgot you could do it this way.
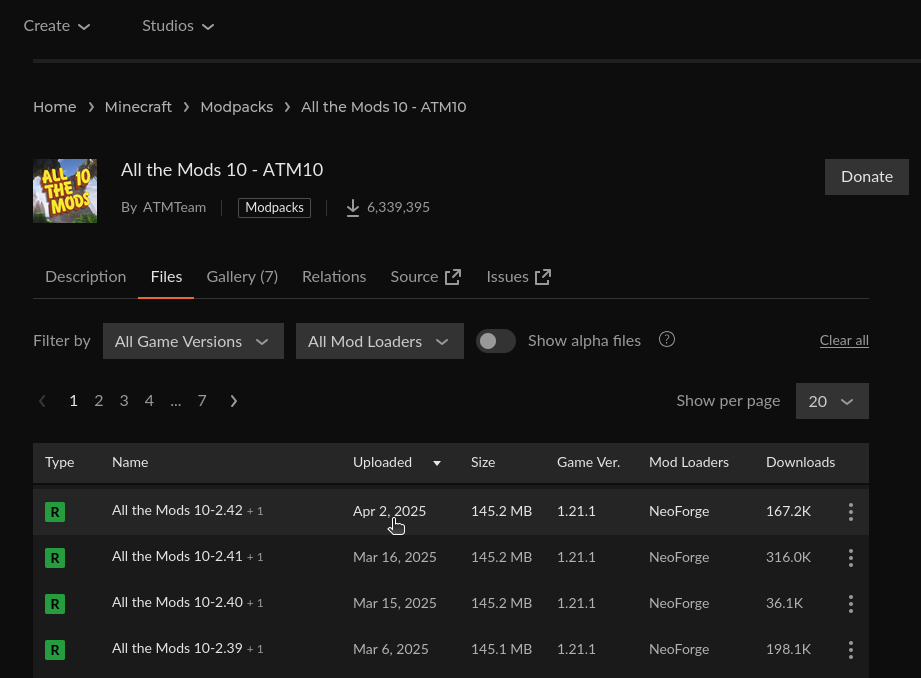
Step 1: Go to the CurseForge page of your choice. For the purposes of this guide, we’ll be looking at ATM10 since it covers a few weird edge cases.
Step 2: Browse to the Files tab and click on the version of the pack you want to run
Step 3: Scroll down a little and click on the Additional Files section below the version info
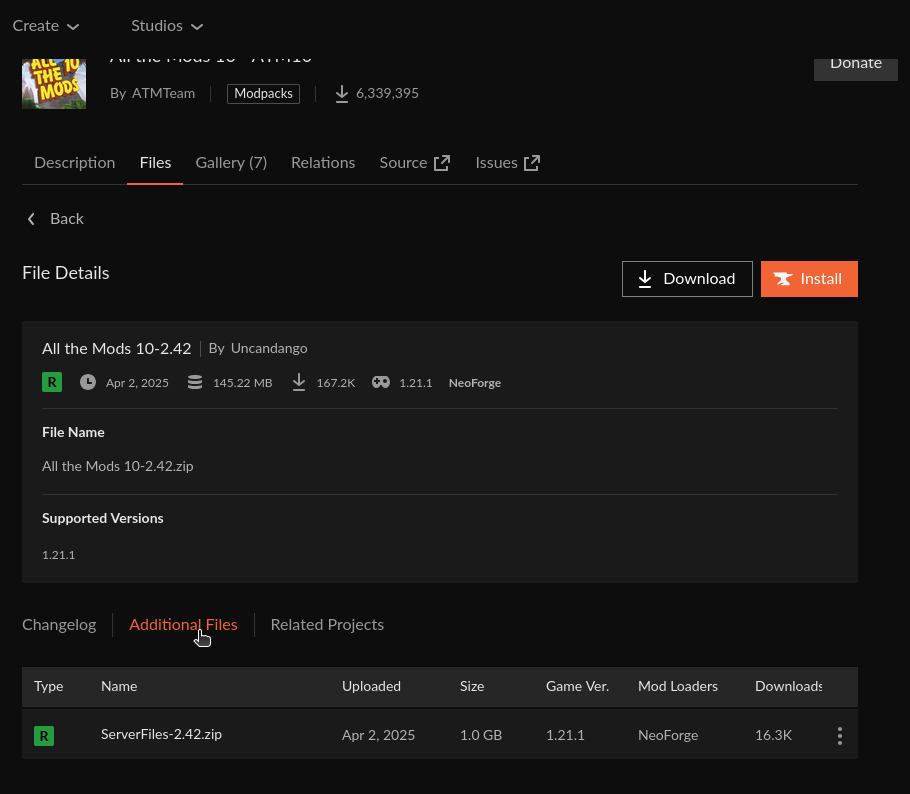
Step 4: Click the ... next to the file and press Download File
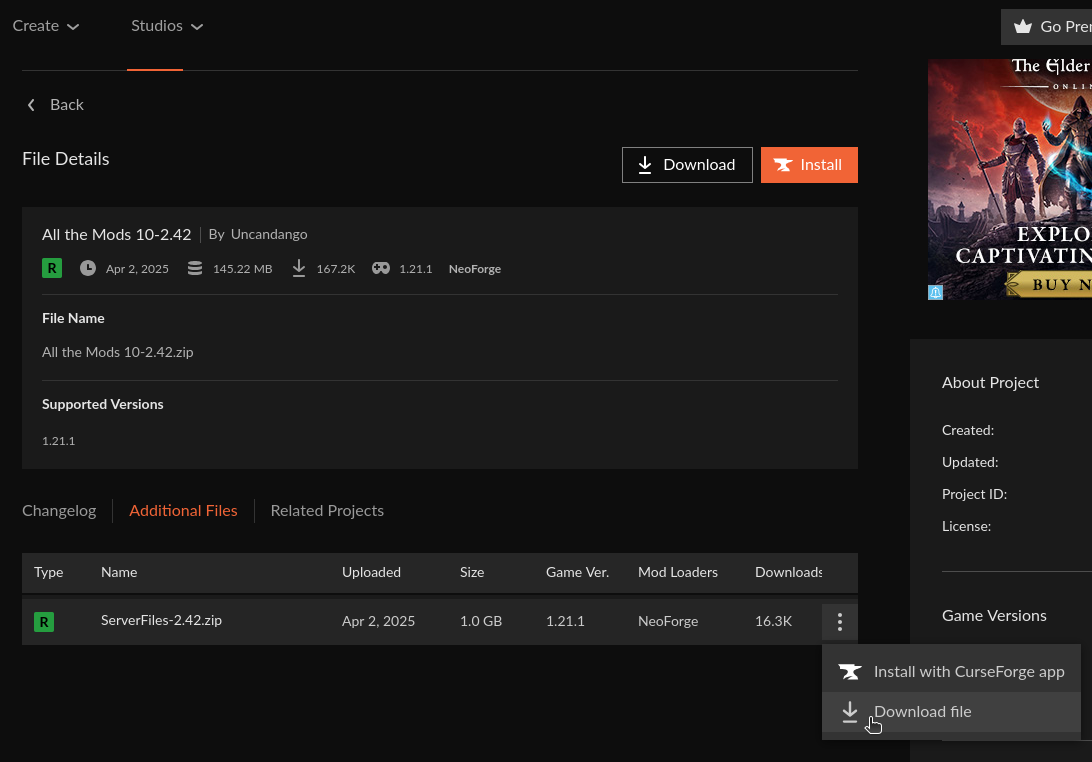
Step 5: Cancel the download, then right-click and copy the try again link

Step 6: Manage the Minecraft instance and click on the File Manager tab on the left
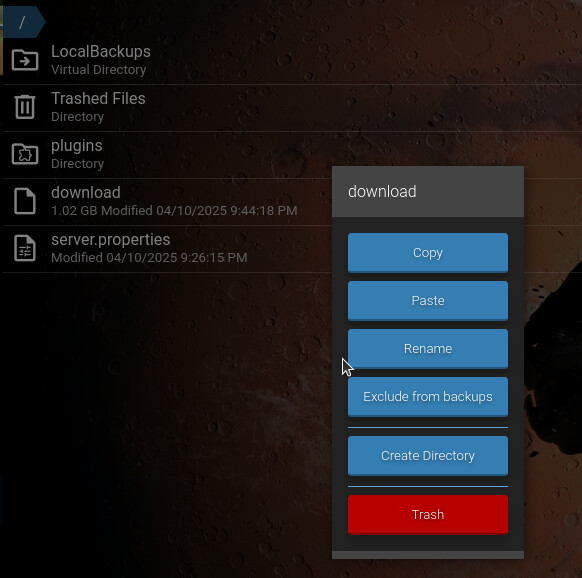
Step 7: Right click an empty space in the File Manager and press Download file here
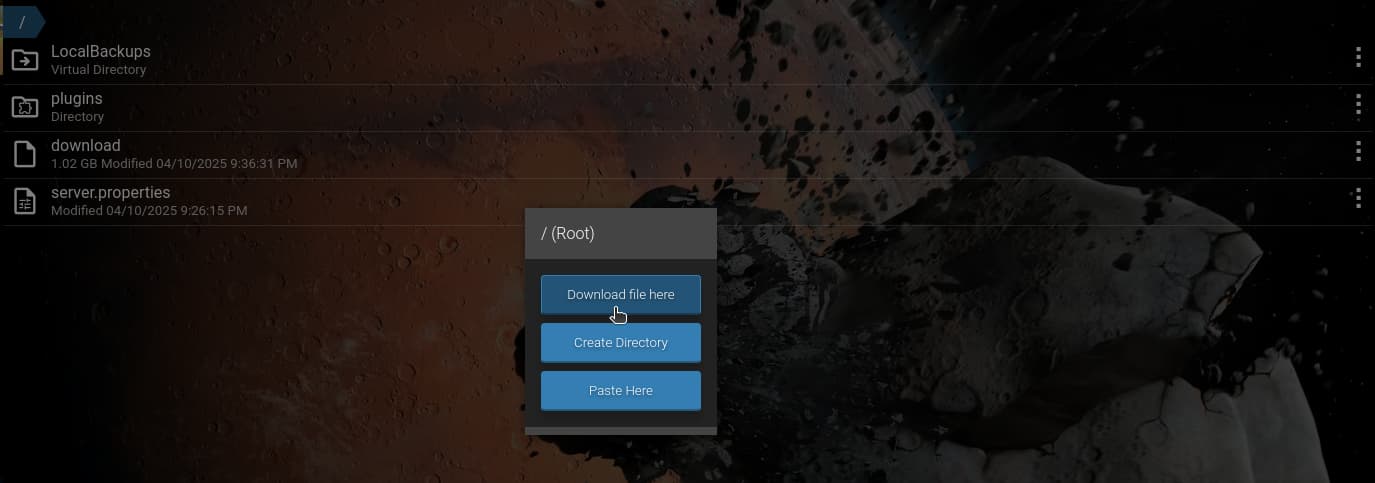
Step 8: Enter the URL into the field and press Ok

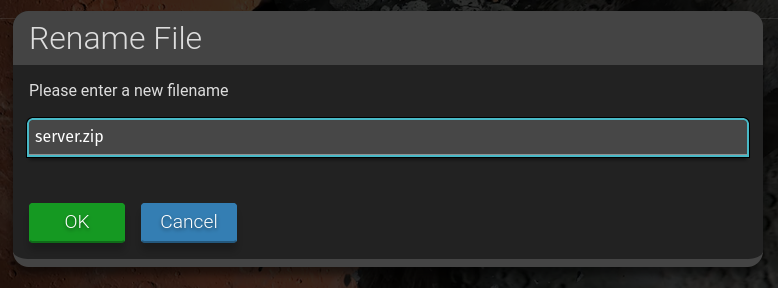
Step 9: Right click the file named download and rename it to server.zip
1.2. Extracting the Zip
Sounds easy doesn’t it? Sometimes it is, and other times things are extra complicated for seemingly no reason. so much fun
Step 1: Right click the server.zip and press Extract Here
Step 2: Assess the situation
Normally in the / directory you should now have a pile of new files named mods, config, libraries etc. And if you click on the mods folder you should see a bunch of .jar files (those are your mods).
If you see those files you can skip to 1.4. Cleanup.
If you only see one new folder (like in this example), continue on to Step 3
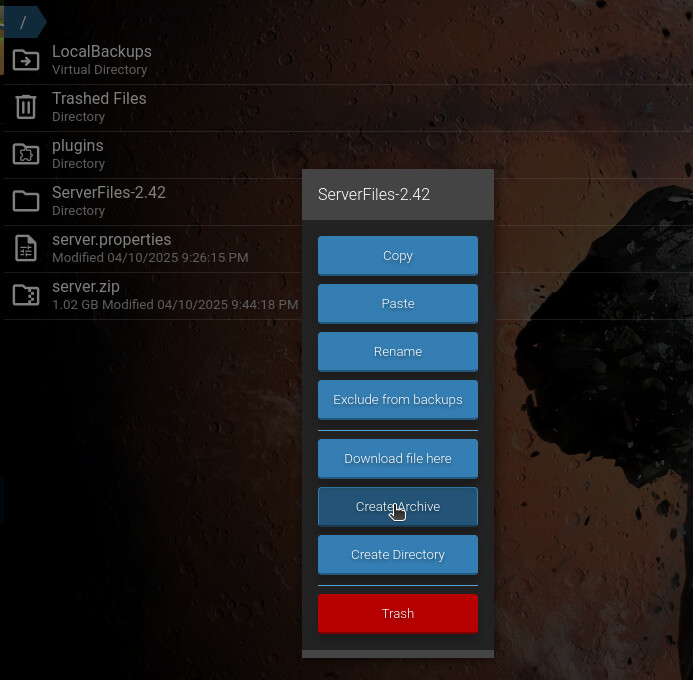
Step 3: Right click the new folder and press Create Archive
Counter intuitive, I know, but bear with me.
Step 4: Right click your new zip and press Extract Here
Things are in the right place now! You should see all of the folder’s files barfed into the / directory.

1.3. Double Check
Check that you now have some new config and mods, and some other folders in the server’s directory.
If not, review the steps for extracting the zip to make sure the files aren’t in a nested folder, otherwise the pack might have one of those stupid start scripts that downloads the mods.
Commonly those are labled as a startserver.sh/.bat or installserver.sh/.bat.
If that is the case:
- Download the modded files to a folder on your PC
- Run the installer in that folder (double click the
.bat(BATCH) file if you’re on Windows) - Select all the files inside the folder
- Zip the files
- Upload the zip to AMP and run through the previous section again
1.4. Cleanup
You can now delete any .zip you used while setting up the server, and delete the extra ServerFiles folder if you have one of those as well.
Now you’re ready to move onto 3. Configuring the Server to finish setting up the server.
2. Feed The Beast
2.1. Installation
When following 3. Configuring the Server you will need to change the Server Type setting to the required modloader. The server won’t start properly otherwise.
2.1.1. x86 Systems
Step 1: Set the Server Type setting to Feed The Beast (New Source)
Found under Configuration -> Minecraft -> Server and Startup
Step 2: Select the modpack you want using the FTB Modpack setting
Step 3: Press Download/Update
Step 4: Continue onto 3. Configuring the Server to finish setting up the server
2.1.2. ARM Systems
If you’re running Linux and you’re familiar with the terminal, upload the ARM installer to AMP using AMP’s File Manager and run it as the amp Linux user.
First run sudo su -l amp, then you’ll find the file under /home/amp/.ampdata/instances/{TheInstnaceName}/Minecraft
Step 1: Download the server installer from the FTB site
Step 2: Run the installer on your PC in a new folder
Step 3: Select the files inside the folder and zip them
Step 4: Extract the .zip using AMP’s File Manager
*For a more in-depth rundown on working with the zip, see 1.2. Extracting the Zip
Step 5: Continue onto 3. Configuring the Server to finish setting up the server
3. Configuring the Server
In this section we’ll be going over how you can find important modloader and Java information across different files and enter that info into AMP’s web interface.
3.1. AMP’s Settings
The following settings are all in Configuration -> Minecraft
Here we go with some definitions:
-
Arg
-Xmx:
→ Goes underJava and Memory -> Memory Limit (MB)in terms of megabytes (1GB →1024MB)
Note: Allocating more than 16GB of RAM can have a negative performance impact on the CPU due to larger Garbage Collection (GC) spikes. -
Arg
-Xms:
→ Goes underJava and Memory -> Memory pre-allocation (MB)in terms of megabytes (1GB →1024MB)
Note: You can leave this as256MB unless directed otherwise by the modpack creator or the author of the startup arguments you’re using. -
Any argument prefixed with
-Dor-XX::
Java and Memory -> Additional java optionsseparated by spaces
Note: Do not add these underServer and Startup -> Additional server arguments -
Arg
-jar jarname.jar:
→ Select the Jar underServer and Startup -> Server Jar
Note: Forge 1.17.1-1.20.2 and NeoForge 1.20.1-present do not have conventional startup Jars. In such cases, select theServer Type(modloader) and version the modpack needs and leave theServer JarasAutoselect.
3.2. Understanding Start Scripts
Some common filenames for server start scrips are run.sh, start.sh, and startserver.sh. You’ll also see these files with the .bat file extension (you may have all, some, or none of these files, but the core ideas still apply).
3.2.1. Breaking Down run.sh
Open the run.sh file in AMP’s file manager.
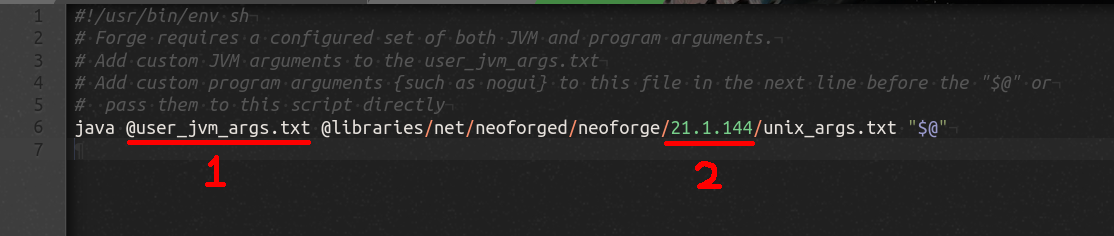
- This file contains a list of
Additional java optionsthat you can copy into AMP’s settings - Here you’ll see the Forge/NeoForge version the modpack is using
Here’s another example using a different startup command

Java and Memory -> Memory Limit (MB)→4096Java and Memory -> Memory pre-allocation (MB)→2048Java and Memory -> Additional java options→-Dfile.encoding=UTF8 -Dfml.readTimeout=180Server and Startup -> Server Jar→forge-1.20.4-49.2.0-shim.jar49.2.0would be the Forge version the modpack is using
3.2.2. Breaking Down startserver.sh
Please note, some of these alternate startup scripts may differ, so this is a general rundown using the one from the CurseForge example.
Open the startserver.sh file in AMP’s file manager.
At the top of the script you’ll see a line with:
NEOFORGE_VERSION=21.1.143, FORGE_VERSION=xxxx or FABRIC_VERSION=xxxx
This will be the Forge/NeoForge version the modpack is using
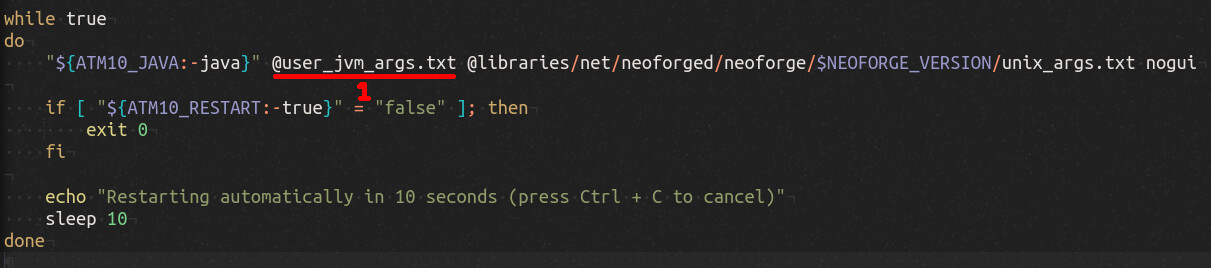
- This file contains a list of
Additional java optionsthat you can copy into AMP’s settings
3.2.3. GTNH
I don’t have a screenshot handy at the moment, but GTNH differs slightly from the other examples.
Enter the following into your settings:
Server and Startup -> Server Type→ForgeServer and Startup -> Forge Version→ The Forge version the pack currently usesServer and Startup -> Server Jar→lwjg13ify-forgePatches.jarJava and Memory -> Java version→Java 17,Java 21, orJava 25depending on what your version of the modpack asks forJava and Memory -> Additional java options→-Dfml.readTimeout=180 @java9args.txt
3.3. Modloader Information
You should see the modpack’s modloader and version in your launcher, or after loading up the modpack you’ll see the version info in the bottom left of the Minecraft main menu.
All of these settings are under: Configuration -> Minecraft -> Server and Startup
-
For
Server Typeyou’ll want to selectFabric,Forge, orNeoForgedepending on the information shown. -
Now you’ll want to select the correct version of the modloader in AMP’s settings.
-
Press
Download/Update -
If you’re using
Forge/NeoForgeset theServer JartoAutoselect
3.4. Java Settings
All of these settings are under: Configuration -> Minecraft -> Java and Memory
Most often the modpack’s authors will have a recommended amount of RAM to use for the server. If not, anywhere from 6-12GB should do.
This setting is called Memory Limit (MB)
Some modpacks also have suggested Java arguments for you to use while running the server.
You can add these under Additional java options
Make sure to exclude Xmx, Xms, jar, and nogui since AMP’s settings already handle these.
Some versions of Minecraft require different Java runtimes in order to start up and run correctly, so here’s a quick rundown (see a more in depth explanation below).
This setting is called Java Version
- Minecraft
1.7.10-1.15.2useJava 8 - Minecraft
1.16.5use eitherJava 8orJava 11depending on the mods you’re running - Minecraft
1.17.1-1.20.4useJava 17 - Minecraft
1.20.5-1.21.11useJava 21 - Minecraft
26.1and above useJava 25
4. Additional Java Information
| Minecraft Version | Server Type | Java Version | Class file version | Extra Notes |
|---|---|---|---|---|
| <= 1.4.7 | any | Java 7 | Class file version 51 |
Later versions work, mileage may vary |
| 1.6.4 | any | Java 7, 8 | Class file version 52 |
Later versions work, mileage may vary |
| 1.7 - 1.15.2 | any | Java 8 | Class file version 52 |
Later versions work, mileage may vary |
| 1.16 - 1.16.5 | any | Java 8, 11 | Class file version 52 or 55 |
Later versions work, mileage may vary |
| 1.16.x | Forge | Java 8, 11 | Class file version 52 or 55 |
Depends on the mods you’re running |
| 1.16.5 | Paper | Java 16 | Class file version 60 |
Can be disabled via a startup arg |
| 1.17 - 1.17.1 | any | Java 16, 17 | Class file version 60 or 61 |
Later versions work, mileage may vary |
| 1.18 - 1.20.4 | any | Java 17 | Class file version 61 |
Later versions work, mileage may vary |
| 1.20.5 - 1.21.11 | any | Java 21 | Class file version 65 |
Later versions work, mileage may vary |
| 26.1 | any | Java 25 | Class file version 69 |
Later versions work, mileage may vary |
A table comparing Java runtime versions to class versions: Java version history - Wikipedia
See this post here regarding installing more Java runtimes: AMP Dependencies - Java
Please Note:
a. You’ll need to stop/start the MC instance via the main panel for the Java versions to refresh.
b. You may need to reboot if stopping/starting the instance doesn’t work
On Linux:
Run getamp installJava as root to download Java 8, 11, 17, 21, and 25
On Windows make sure:
a. You select the default install location
b. You add Java to the PATH variable