
This guide assumes that AMP is being deployed for Enterprise Usage in a dedicated server environment with a direct internet connection with no NAT. We are not offering support for issues resulting from NAT’ed connections at this time.
If you’re using AMP Network Edition, skip to Activating ADS.
Supported Platforms
- Debian 10 or newer
- Ubuntu 20.04 or newer
Using the latest available (Debian 12/Ubuntu 22.04) is recommended
Prerequisites
When running in Enterprise Mode, the following requirements apply:
- AMP must be served over HTTPS, either using a reverse proxy (recommended, supports LetsEncrypt) or with the internal implementation (PFX certificate required)
- On Linux systems, hidepid must be configured. Without it AMP will not create instances.
Additionally the following changes are recommended:
- New instances should be bound to a specific IP address rather than the default of 127.0.0.1 if you want to allow users to access their instances directly instead of logging in via ADS.
- Your auth server URL should be a fully-qualified URL as HTTPS is mandatory for the auth server URL in Enterprise mode.
Activating ADS
By default ADS should be activated after performing the first time setup wizard. If you do not see the Enterprise or Network Edition features you need to set it up to allow activation, then activate it with your key.
Run the following commands while AMP is stopped (Applies on any platform):
ampinstmgr reconfigure ADS01 +Core.AMP.RequireActivation True
ampinstmgr reactivate ADS01 *yourlicencekeygoeshere*
You will need to perform these steps on all your controllers and targets.
Configuration Changes
On each target/standalone server:
- Configuration / Networking / Use Host Networking for Containers - It is recommended that this is disabled if you’re using Docker as customers would be able to start listening on unauthorised ports. When using the default networking mode AMP will only allow through those ports which are specifically assigned to that instance.
- Configuration / New Instance Defaults / Default Settings - It is recommended you add the following key/value pairs:
| Key | Value | Comment |
|---|---|---|
| Core.Privacy.AllowAnalytics | False | Disables analytics, important for GDPR compliance |
| Core.Security.RequireSessionIPStickiness | False | Users in campuses or using certain ISPs may have IP addresses that change frequently which will continually end their session unless this is set to False |
| Core.Branding.DisplayBranding | True | |
| Core.Branding.CompanyName | Your company name here | |
| — Other branding settings here — | See AMPConfig.conf for the rest of the settings | |
| Core.Monitoring.UseMulticoreCPUCalc | False | AMPs default CPU usage calculation may be confusing to inexperienced users |
| FileManagerPlugin.SFTP.SFTPEnabled | True | Allows users to connect via SFTP using their panel username/password to a locked down SFTP server that only lets them access their instances files |
*A full list of provisioning arguments are at the bottom of this article
Creating a template ‘customer’ role.
You’ll want to create a locked down role that applies to all of your customers regardless of what instance they have access to. To do this follow these steps:
- Create at least one of each instance type that you intend to sell from your controller, it doesn’t matter where they’re made and these can be deleted later if you don’t need them around. These instances won’t be required to actually run the application, just to get AMP running.
- Then in ADS, go to Configuration / Role Management and select “Create Template Role” with a name of your choice (such as Customer)
- Edit this roles permissions within ADS and make sure it has no permissions (all permissions greyed out)
- For each of the instance types you’re going to sell:
-
- Manage the instance
-
- Go to Configuration / Role Management Find the “Customer” role you created earlier
-
- Assign only those specific permissions you wish to allow customers using this instance type to have. Be careful not to allow the use of settings that affect networking behaviour such as IP/port numbers or could allow setting extra command line flags that affect things like resource allocation.
Creating deployment templates
Deployment templates are used to dictate what AMP can deploy, and these are what are exposed to billing integrations as available products.
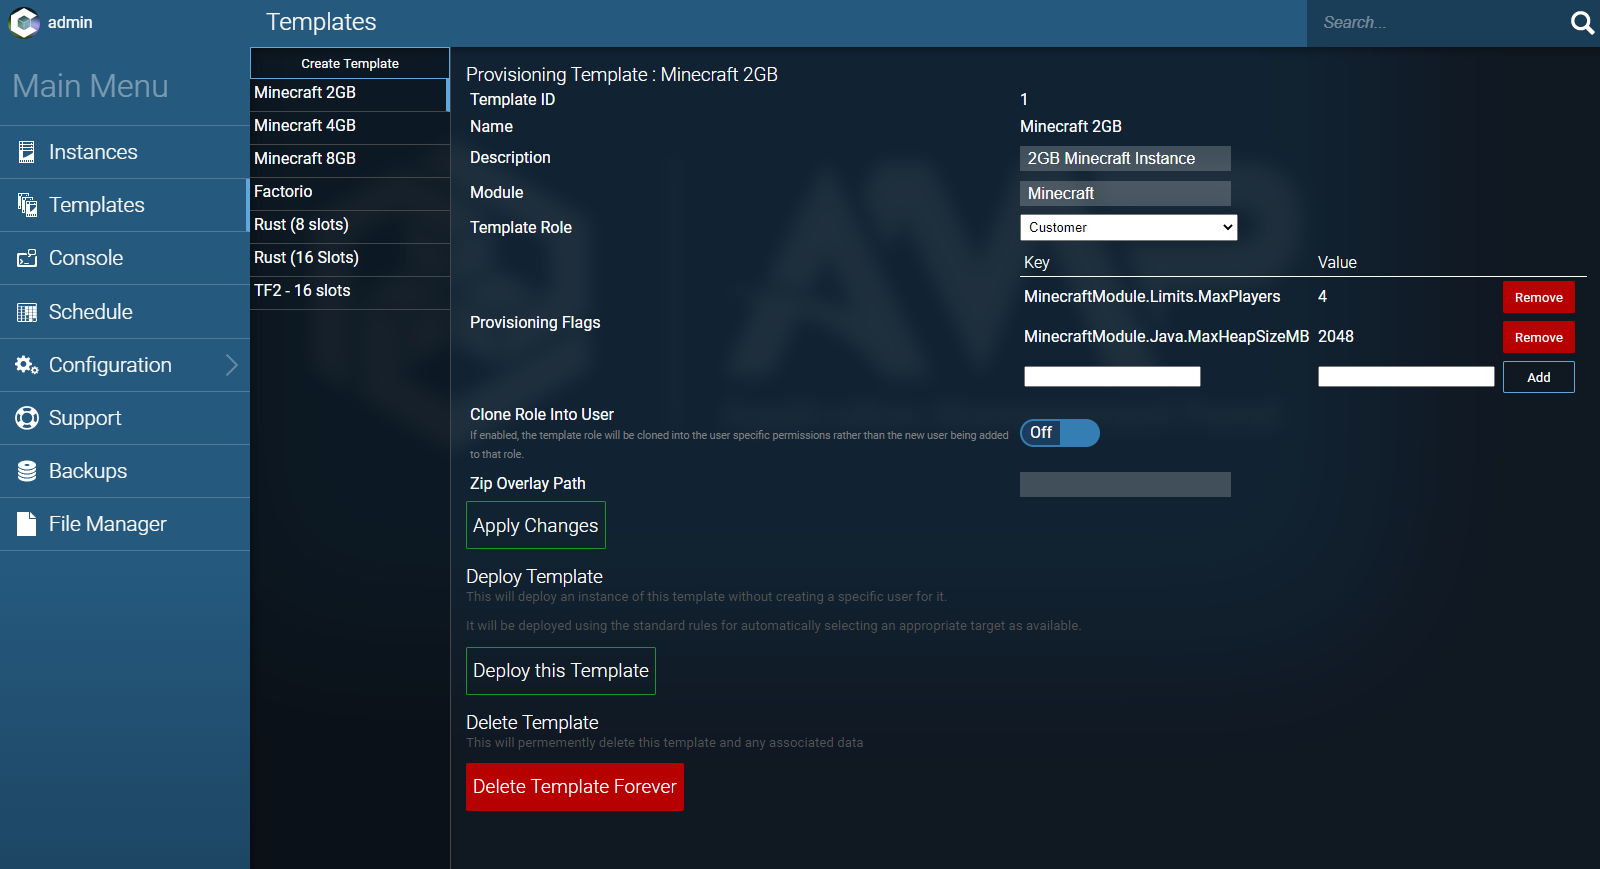
First select ‘Create Template’ and name it depending on what product/service you wish to offer. This name should be unique and not shared with other templates.
The module type needs to be the name of the module that will be loaded for the deployed instance. These names are CaSe SeNsItIvE - you can see the module name for a given existing instance by selecting it and looking at the “Module” field on the right hand side.
The Template Role should be the role that any users created automatically for the created instance will be assigned to, so you should select the “Customer” role.
Provisioning Flags allow you to apply settings that will apply to this instance by default when it’s created. The key takes the format of: FullModuleName.Section.Field - These node names exactly match those used by the .kvp files for the individual instances.
For example, for a Minecraft module based instance, there is a file called MinecraftModule.kvp, and it contains a line that reads Java.MaxHeapSizeMB=1024
So the final node name is MinecraftModule.Java.MaxHeapSizeMB with a value of whatever you’d like (for example 4096 to create a template for a 4GB Minecraft Server).
You should create a test instance for each type you intend to offer to customers and use that to pull the settings from the applicable configuration files to feed into the template.
Once you’ve modified your template select “Apply Changes”.
Installing the AMP WHMCS module
You can download the WHMCS module here: GitHub - CubeCoders/WHMCSModule This page also includes installation instructions. You will need to request access to this repository via contact@cubecoders.com if you don’t already have permission to view it.
List of all template options
ADS Module
ADSModule.Limits.InstanceLimit=32
ADSModule.Limits.CreateLocalInstances=True
ADSModule.Defaults.NewInstanceKey=enc:sNSxBfdW0TiecDH+nIxCm15/yWy2UWUoQeKguOLhevz/igjRrHHUGXuFeoDZqMVL
ADSModule.Defaults.DefaultSettings={"Core.Privacy.AutoReportFatalExceptions":"true","Core.Privacy.AllowAnalytics":"true","CustomMountBinds":"{\"/home/amp/test\":\"/mnt/test\"}"}
ADSModule.Defaults.DefaultReleaseStream=Mainline
ADSModule.Defaults.UseDocker=True
ADSModule.Defaults.CreateAsShared=False
ADSModule.Defaults.DefaultAuthServerURL=https://amp.example.com/
ADSModule.Defaults.PropagateAuthServer=False
ADSModule.Defaults.PropogateRepos=True
ADSModule.Defaults.UseOverlays=False
ADSModule.Defaults.OverlayPath=/opt/cubecoders/amp/shared/overlays
ADSModule.Defaults.OverlayManifestURL=
ADSModule.Defaults.MatchVersion=False
ADSModule.Defaults.DefaultPostCreate=StartInstance
ADSModule.Defaults.ExcludeFromFirewall=False
ADSModule.Defaults.UPnPSync=False
ADSModule.ADS.LocalAuxDataDir=localaux
ADSModule.ADS.AutoReactivate=True
ADSModule.ADS.Mode=Target
ADSModule.ADS.AutostartInstances=True
ADSModule.ADS.InstanceStartDelay=5000
ADSModule.ADS.IgnoreCompatibility=False
ADSModule.ADS.TemplateCallbackURL=https://example.com/api/deploycallback
ADSModule.ADS.DevelopmentMode=False
ADSModule.ADS.LogAllTemplateDeployments=False
ADSModule.ADS.SingleUserInstance=False
ADSModule.ADS.UseTagAsInstanceName=False
ADSModule.ADS.ConfigurationRepositories=["CubeCoders/AMPTemplates","IceOfWraith/AMPTemplates:dev","Greelan/AMPTemplates:dev"]
ADSModule.ADS.ShowDeprecated=True
ADSModule.Network.DefaultIPBinding=127.0.0.1
ADSModule.Network.DefaultAppIPBinding=0.0.0.0
ADSModule.Network.DockerExternalIPBinding=0.0.0.0
ADSModule.Network.AMPPortRanges=["8081:8180"]
ADSModule.Network.PortAssignment=Include
ADSModule.Network.AppPortRanges=["40400:40599"]
ADSModule.Network.AppPortExclusions=["0:1024"]
ADSModule.Network.MetricsServerPort=12820
ADSModule.Network.UseDockerHostNetwork=True
ADSModule.Network.UseTraefik=False
ADSModule.Network.TraefikNetworkName=internal
ADSModule.Network.TraefikDomainWildcard=*.domain.tld
ADSModule.Network.AccessMode=ViaTarget
ADSModule.Network.BaseURL=https://amp.example.com
Generic Module
GenericModule.Meta.DisplayName=DayZ (Original)
GenericModule.Meta.Description=DayZ (Original) Dedicated Server
GenericModule.Meta.OS=Windows
GenericModule.Meta.AarchSupport=Unknown
GenericModule.Meta.Arch=x86_64
GenericModule.Meta.Author=Greelan, Aperture Development, IceOfWraith
GenericModule.Meta.URL=https://dayz.com/
GenericModule.Meta.DisplayImageSource=steam:221100
GenericModule.Meta.EndpointURIFormat=steam://connect/{ip}:{GenericModule.App.Ports.$QueryPort}
GenericModule.Meta.ConfigManifest=dayz-originalconfig.json
GenericModule.Meta.MetaConfigManifest=dayz-originalmetaconfig.json
GenericModule.Meta.ConfigRoot=dayz-original.kvp
GenericModule.Meta.MinAMPVersion=2.4.2.0
GenericModule.Meta.SpecificDockerImage=
GenericModule.Meta.DockerRequired=False
GenericModule.Meta.DockerBaseReadOnly=False
GenericModule.Meta.ContainerPolicy=Supported
GenericModule.Meta.ContainerPolicyReason=
GenericModule.Meta.ExtraSetupStepsURI=https://discourse.cubecoders.com/docs?topic=3454?utm_source=ampcreate&utm_content=dayz
GenericModule.Meta.Prerequsites=[]
GenericModule.Meta.ExtraContainerPackages=[]
GenericModule.Meta.ConfigReleaseState=NotSpecified
GenericModule.Meta.NoCommercialUsage=False
GenericModule.Meta.ConfigVersion=0.0.0.0
GenericModule.Meta.ReleaseNotes=
GenericModule.Meta.BreakingReleaseNotes=
GenericModule.Meta.OriginalSource=CubeCoders-AMPTemplates
GenericModule.App.DisplayName=DayZ (Original)
GenericModule.App.RootDir=./dayz/
GenericModule.App.BaseDirectory=./dayz/223350/
GenericModule.App.SteamWorkshopDownloadLocation=
GenericModule.App.ExecutableWin=223350\DayZServer_x64.exe
GenericModule.App.ExecutableLinux=application
GenericModule.App.WorkingDir=223350
GenericModule.App.LinuxCommandLineArgs=
GenericModule.App.WindowsCommandLineArgs=
GenericModule.App.CommandLineArgs={{$PlatformArgs}} "-profiles={{$FullBaseDir}}DayZServerData" "-bepath={{$FullBaseDir}}battleye" -port={{$GamePort}} -config=serverDZ.cfg -dologs -adminlog -freezeCheck -ip={{$ApplicationIPBinding}} {{$FormattedArgs}} {{filePatching}}{{EnableLimitFPS}}"{{CustomServerArgs}}"
GenericModule.App.UseLinuxIOREDIR=False
GenericModule.App.AppSettings={}
GenericModule.App.EnvironmentVariables={"LD_LIBRARY_PATH":"{{$FullBaseDir}}linux64:%LD_LIBRARY_PATH%","SteamAppId":"221100"}
GenericModule.App.CommandLineParameterFormat="-{0}={1}"
GenericModule.App.CommandLineParameterDelimiter=
GenericModule.App.ExitMethod=String
GenericModule.App.ExitTimeout=30
GenericModule.App.ExitString=#shutdown
GenericModule.App.ExitFile=app_exit.lck
GenericModule.App.HasWriteableConsole=True
GenericModule.App.HasReadableConsole=True
GenericModule.App.SupportsLiveSettingsChanges=False
GenericModule.App.LiveSettingChangeCommandFormat=set {0} "{1}"
GenericModule.App.ApplicationIPBinding=0.0.0.0
GenericModule.App.Ports=[{"Protocol":1,"Port":40601,"Offset":0,"Range":1,"Ref":"GamePort","Name":"Game Port","Description":"Main game port used by the server","ChildPorts":null},{"Protocol":1,"Port":40602,"Offset":0,"Range":1,"Ref":"ReservedPort","Name":"Reserved Port","Description":"Reserved port","ChildPorts":null},{"Protocol":1,"Port":40603,"Offset":0,"Range":1,"Ref":"BattlEyePort","Name":"BattlEye Port","Description":"Port for BattlEye traffic","ChildPorts":null},{"Protocol":1,"Port":40604,"Offset":0,"Range":1,"Ref":"QueryPort","Name":"Steam Query Port","Description":"Port used for Steam queries","ChildPorts":null},{"Protocol":1,"Port":40605,"Offset":0,"Range":1,"Ref":"RCONPort","Name":"RCON Port","Description":"Port used for RCON","ChildPorts":null}]
GenericModule.App.RemoteAdminPort=0
GenericModule.App.AdminPortRef=RCONPort
GenericModule.App.PrimaryApplicationPortRef=GamePort
GenericModule.App.UniversalSleepApplicationUDPPortRef=GamePort
GenericModule.App.UniversalSleepSteamQueryPortRef=QueryPort
GenericModule.App.MaxUsers=60
GenericModule.App.UseRandomAdminPassword=True
GenericModule.App.PersistRandomPassword=True
GenericModule.App.RemoteAdminPassword=enc:Ok3RVbmp1Wd7LxIntxjh0AxnXgis+XGJvtY7W5DjqB+i+Klb8KvBT6gdPDYaKoOX
GenericModule.App.AdminMethod=BattlEyeRCON
GenericModule.App.AdminLoginTransform=None
GenericModule.App.LoginTransformPrefix=
GenericModule.App.RCONConnectDelaySeconds=15
GenericModule.App.RCONConnectRetrySeconds=15
GenericModule.App.RCONHeartbeatMinutes=0.5
GenericModule.App.RCONHeartbeatCommand=ping
GenericModule.App.TelnetLoginFormat={0}
GenericModule.App.UpdateSources=[]
GenericModule.App.ForceUpdate=False
GenericModule.App.ForceUpdateReason=
GenericModule.App.Compatibility=None
GenericModule.App.SteamUpdateAnonymousLogin=False
GenericModule.App.SteamForceLoginPrompt=True
GenericModule.App.RapidStartup=False
GenericModule.App.HasSuccessfullyUpdatedAtLeastOnce=True
GenericModule.App.MonitorChildProcess=False
GenericModule.App.DumpFullChildProcessTree=False
GenericModule.App.MonitorChildProcessWaitMs=100
GenericModule.App.MonitorChildProcessName=
GenericModule.App.SupportsUniversalSleep=False
GenericModule.App.WakeupMode=Any
GenericModule.App.ApplicationReadyMode=RegexMatch
GenericModule.App.AttemptedExtIPFetch=True
GenericModule.App.IPFetchLimiter=System.Threading.SemaphoreSlim
GenericModule.App.LastFailedIPFetch="2023-11-25T03:44:22.7989965Z"
GenericModule.App.TemplateMatchRegex={{(\$?[\w]+)}}
GenericModule.Console.FilterMatchRegex=
GenericModule.Console.FilterMatchReplacement=
GenericModule.Console.ThrowawayMessageRegex=^((WARNING|ERROR): Shader.+|Unknown command)$
GenericModule.Console.AppReadyRegex=^RCon admin #\d+ \([\d\.:]+\) logged in$
GenericModule.Console.UserJoinRegex=^Player #(?<sessionid>\d+?) (?<username>.+?) \((?<endpoint>.+?):(?:\d+)\) connected$
GenericModule.Console.UserLeaveRegex=^Player #(?<sessionid>\d+?) (?<username>.+?) disconnected$
GenericModule.Console.UserChatRegex=^$
GenericModule.Console.UpdateAvailableRegex=^\[\d\d:\d\d:\d\d\] \[INFO\] A new server update is available! v[\d\.]+.$
GenericModule.Console.MetricsRegex=
GenericModule.Console.SuppressLogAtStart=False
GenericModule.Console.ActivateLogRegex=
GenericModule.Console.UserActions={}
GenericModule.Limits.SleepMode=True
GenericModule.Limits.SleepOnStart=False
GenericModule.Limits.SleepDelayMinutes=5
GenericModule.Limits.DozeDelay=2
GenericModule.Limits.AutoRetryCount=5
GenericModule.Limits.SleepStartThresholdSeconds=25
*Further settings can be adjusted as seen in the *config.json files found on the AMPTemplates repo by using the following format:
GenericModule.App.AppSettings.$FieldName so to set a Server Name for ARK SE you’d use GenericModule.App.AppSettings.$SessionName. Note that this applies to all generic instances created with this type and may have overlapping settings.
GenericModule.App.AppSettings.$$MaxUsers is a special setting that most templates support. Notice it requires double $$.
Minecraft Module
MinecraftModule.Java.CustomPath=
MinecraftModule.Java.MaxHeapSizeMB=1024
MinecraftModule.Java.UseSystemRAMAsTotal=False
MinecraftModule.Java.CustomOpts=
MinecraftModule.Java.JavaVersion=
MinecraftModule.Minecraft.ServerPath=./Minecraft/
MinecraftModule.Minecraft.ServerMOTD=Powered by AMP
MinecraftModule.Minecraft.SkipEULACheck=False
MinecraftModule.Minecraft.ServerType=Official
MinecraftModule.Minecraft.EnableTPSMonitor=True
MinecraftModule.Minecraft.CustomStartupString=
MinecraftModule.Minecraft.CustomNormalizerRegex=
MinecraftModule.Minecraft.CustomNormalizerReplacement=
MinecraftModule.Minecraft.FTBModpack=
MinecraftModule.Minecraft.FTBModpackNew=
MinecraftModule.Minecraft.ReleaseStream=Stable
MinecraftModule.Minecraft.SpecificVersion=
MinecraftModule.Minecraft.SpecificSpigotVersion=
MinecraftModule.Minecraft.SpecificForgeVersion=
MinecraftModule.Minecraft.SpecificSpongeVersion=
MinecraftModule.Minecraft.SpecificPaperVersion=
MinecraftModule.Minecraft.SpecificPurpurVersion=
MinecraftModule.Minecraft.FabricMCVersion=
MinecraftModule.Minecraft.FabricLoaderVersion=
MinecraftModule.Minecraft.FabricInstallerVersion=
MinecraftModule.Minecraft.ServerJAR=
MinecraftModule.Minecraft.ServerIPBinding=0.0.0.0
MinecraftModule.Minecraft.PortNumber=40401
MinecraftModule.Minecraft.AdditionalOpts=
MinecraftModule.Minecraft.SuppressGarbage=True
MinecraftModule.Minecraft.PreventProxy=True
MinecraftModule.Minecraft.EnableLANVisibility=False
MinecraftModule.Minecraft.UseNativeTransport=True
MinecraftModule.Minecraft.NetworkCompressionThreshold=256
MinecraftModule.Minecraft.EntityBroadcastRange=100
MinecraftModule.Minecraft.WorldSeed=CubeCodersPowered
MinecraftModule.Minecraft.RateLimt=0
MinecraftModule.Minecraft.WorldType=DEFAULT
MinecraftModule.Minecraft.ViewDistance=10
MinecraftModule.Minecraft.SimulationDistance=10
MinecraftModule.Minecraft.HideOnlinePlayers=False
MinecraftModule.Minecraft.EnableStatus=True
MinecraftModule.Minecraft.AllowAnalytics=False
MinecraftModule.Minecraft.LevelName=world
MinecraftModule.Minecraft.MaxWorldSize=29999984
MinecraftModule.Minecraft.WorldGenSettings=
MinecraftModule.Minecraft.GenStructures=True
MinecraftModule.Minecraft.EnableNether=True
MinecraftModule.Minecraft.RequireResourcePack=False
MinecraftModule.Minecraft.ResourcePackPrompt={"text":"A resource pack is required to connect to this server.","color":"red"}
MinecraftModule.Minecraft.ResourcePackURL=
MinecraftModule.Minecraft.ResourcePackSHA1=
MinecraftModule.Minecraft.RestartOnSevere=False
MinecraftModule.Minecraft.SyncChunkWrites=True
MinecraftModule.Minecraft.StandaloneServer=True
MinecraftModule.Minecraft.EnableJMX=False
MinecraftModule.Game.ForceGameMode=False
MinecraftModule.Game.GameMode=Survival
MinecraftModule.Game.Difficulty=Normal
MinecraftModule.Game.OpPermssions=StopServer
MinecraftModule.Game.FuncPermissions=StopServer
MinecraftModule.Game.SpawnProtectionRadius=15
MinecraftModule.Game.HardcoreMode=False
MinecraftModule.Game.EnableMonsters=True
MinecraftModule.Game.EnableAnimals=True
MinecraftModule.Game.EnableNPCs=True
MinecraftModule.Game.EnablePVPCombat=False
MinecraftModule.Game.AllowFlight=False
MinecraftModule.Game.AllowCommandBlocks=False
MinecraftModule.Game.TimeoutMins=15
MinecraftModule.Game.Whitelist=False
MinecraftModule.Game.MaxTickTime=60000
MinecraftModule.Game.MaxBuildHeight=256
MinecraftModule.Limits.MaxPlayers=10
MinecraftModule.Limits.MaxViewDistance=32
MinecraftModule.Limits.RequireApprovedHash=False
MinecraftModule.Limits.HashWhitelist=[]
MinecraftModule.Limits.AutoWhitelistOfficial=True
MinecraftModule.Limits.SleepMode=True
MinecraftModule.Limits.SleepWakeMode=OnUserJoin
MinecraftModule.Limits.SleepOnStart=False
MinecraftModule.Limits.SleepMessage=Server starting, please reconnect...
MinecraftModule.Limits.SleepDelayMinutes=5
MinecraftModule.Limits.DozeDelay=2
MinecraftModule.Limits.MaxChainedNeigbourUpdates=1000000
MinecraftModule.Limits.StopTimeout=60
SRCDS Module
SRCDSModule.SRCDS.SteamCMDPath=./srcds/
SRCDSModule.SRCDS.ExecPath=.
SRCDSModule.SRCDS.Map=gm_construct
SRCDSModule.SRCDS.Players=8
SRCDSModule.SRCDS.ServerName=Source Dedicated Server - Powered by AMP
SRCDSModule.SRCDS.ServerPassword=
SRCDSModule.SRCDS.FastDLURL=
SRCDSModule.SRCDS.CustomOpts={}
SRCDSModule.SRCDS.ServerType=Garry's Mod Dedicated Server
SRCDSModule.SRCDS.VAC=True
SRCDSModule.SRCDS.GSLT=
SRCDSModule.SRCDS.workshop_collection=
SRCDSModule.SRCDS.workshop_auth_key=
SRCDSModule.SRCDS.gmod_gamemode=sandbox
SRCDSModule.SRCDS.ServerIPBinding=0.0.0.0
SRCDSModule.SRCDS.ServerPortBinding=40403
SRCDSModule.SRCDS.TickRate=0
SRCDSModule.SRCDS.ServerPurity=WhiteListed_Content
SRCDSModule.SRCDS.CustomRCONPassword=
SRCDSModule.SRCDS.BetaVersion=
SRCDSModule.SRCDS.CSGOGamemode=Deathmatch
SRCDSModule.SRCDS.game_type=1
SRCDSModule.SRCDS.game_mode=2
SRCDSModule.SRCDS.mapgroup=mg_allclassic
SRCDSModule.SourceTV.EnableSourceTV=False
SRCDSModule.SourceTV.AutoRecord=False
SRCDSModule.SourceTV.MaxTVClients=0
SRCDSModule.SourceTV.SourceTVPort=40404
SRCDSModule.SourceTV.AutoCopyDemos=False
SRCDSModule.SourceTV.DemoCopyLocation=
SRCDSModule.SourceTV.TournamentMode=False
SRCDSModule.SourceTV.TournamentModeOutput=
FiveM Module
FiveMModule.ServerSettings.BaseDirectory=./fivem/
FiveMModule.ServerSettings.Game=FiveM
FiveMModule.ServerSettings.IPBinding=0.0.0.0
FiveMModule.ServerSettings.Port=40406
FiveMModule.ServerSettings.EndpointPrivacy=True
FiveMModule.ServerSettings.MaxPlayers=32
FiveMModule.ServerSettings.AllowScripthook=True
FiveMModule.ServerSettings.ShowOnServerList=True
FiveMModule.ServerSettings.Hostname=FiveM - Powered by AMP
FiveMModule.ServerSettings.LicenseKey=
FiveMModule.ServerSettings.SteamAPIKey=
FiveMModule.ServerSettings.EnableOneSync=False
FiveMModule.ServerSettings.EnableOneSyncInfinity=True
FiveMModule.ServerSettings.EnableOneSyncBeyond=True
FiveMModule.ServerSettings.Resources=["mapmanager","chat","spawnmanager","sessionmanager","fivem","hardcap","rconlog","scoreboard"]
FiveMModule.ServerSettings.Tags=["default"]
FiveMModule.ServerSettings.ConnectingBannerURL=
FiveMModule.ServerSettings.DetailBannerURL=
FiveMModule.ServerSettings.ServerIconFile=
FiveMModule.ServerSettings.AutoRestart=True
FiveMModule.ServerSettings.UpdateReleaseStream=Recommended
Rust Module
RustModule.Rust.SteamCMDPath=./rust/
RustModule.Rust.OxideModDownloadURL=https://umod.org/games/rust/download
RustModule.Rust.OxideModDownloadURLLinux=https://umod.org/games/rust/download/develop
RustModule.Rust.OxideModCompilerURL=https://umod-01.nyc3.digitaloceanspaces.com/Compiler.x86_x64
RustModule.Rust.InstallOxide=False
RustModule.Rust.Port=40408
RustModule.Rust.QueryPort=40409
RustModule.Rust.RconPort=40410
RustModule.Rust.AppPlusPort=40411
RustModule.Rust.IP=0.0.0.0
RustModule.Rust.ServerSeed=6738
RustModule.Rust.Tickrate=30
RustModule.Rust.ServerName=My Rust server | Powered by AMP
RustModule.Rust.LevelName=Procedural Map
RustModule.Rust.LevelUrl=
RustModule.Rust.ServerDescription=My Rust server | Powered by AMP
RustModule.Rust.HeaderImageURL=
RustModule.Rust.ServerWebsiteURL=
RustModule.Rust.MaxPlayers=100
RustModule.Rust.TickRate=30
RustModule.Rust.AutoUpdate=True
RustModule.Rust.AntiCheat=False
RustModule.Rust.WorldSize=4500
RustModule.Rust.SaveInterval=4000
RustModule.Rust.EnablePvE=False
RustModule.Rust.CustomArgs=
RustModule.Rust.Release=standard
RustModule.Rust.CustomRCONPassword=
Email Sender Plugin
EmailSenderPlugin.SMTP.UseSSL=False
EmailSenderPlugin.SMTP.Host=localhost
EmailSenderPlugin.SMTP.Port=25
EmailSenderPlugin.SMTP.Username=
EmailSenderPlugin.SMTP.Password=
EmailSenderPlugin.SMTP.EmailFrom=
File Manager Plugin
FileManagerPlugin.Security.RestrictUploadExtensions=False
FileManagerPlugin.Security.RestrictDownloadExtensions=False
FileManagerPlugin.Security.DownloadableExtensions=["yml","json","txt","conf","cfg","dat","mca","png","log","gz","jar","xml","craft","schematic","config","map","zip","lua","csv","ini","mod"]
FileManagerPlugin.Security.UploadableExtensions=["yml","json","txt","conf","cfg","dat","mca","png","log","gz","jar","xml","craft","schematic","config","map","zip","lua","csv","ini","mod"]
FileManagerPlugin.Security.AllowExtensionChange=False
FileManagerPlugin.Security.AllowArchiveOperations=True
FileManagerPlugin.Security.OnlyExtractUploadableExtensionsFromArchives=True
FileManagerPlugin.Security.HoneypotSFTPLogins=True
FileManagerPlugin.FileManager.OverrideBasePath=False
FileManagerPlugin.FileManager.BasePath=./srcds/
FileManagerPlugin.FileManager.AdditionalVirtualDirectories={}
FileManagerPlugin.FileManager.FastFileTransfers=True
FileManagerPlugin.SFTP.SFTPEnabled=True
FileManagerPlugin.SFTP.SFTPPortNumber=40402
FileManagerPlugin.SFTP.SFTPIPBinding=0.0.0.0
FileManagerPlugin.SFTP.SFTPKey=enc:2O7EnEy77DfIAzPHBCP220daJTLSK5gL/ZeyShrdeWAM54HQOK+8ayEkmqrSyfCMqK+onvDBmzyjseFgQEfyr5mOmAnFYu4EZZixsNbOdzWrXIa6yaUsiSRwQdT6QVSIL9MJp6oydrdPFUJfysqatqN6HGtNpY17FMJey8pSKqE1B3Ln7HLGs/aXvGxKaQt/uZFDta2hVJRVAfldXOka6E3+ZcSKTqSUpyuV5JOIONw0vgDFeK4wvtydB1KKvRF649HO0Y/B+hVFAqdTMvuO5eyPFTRW9mejQG+3hEzdvbOOEsfL5oCcLQmjWGrnKQqr5000/EiGmqnbE/o5V71Mjc5fkKW8s+6cdZJL6TvzfQenoxIgZcJVbaL0TusNiQ2W7ch9qqkbbkDBk1zqf1QdYscHIoJe/hl0/ETbVhrclRXgYB07bPXWVsqrUazVw8xgIrNRGIGFZa9mHzSiTlzJI+jDs6DasSDIe2YdIV9beuINhG/lfNoC1oWrhsW4Jf3AuOOd/dGLYABd0QDCEpaNpzmdkOuglS2cDWY59qYDaa3jUgGj1p96BDfMJIcEPE6j9ZFPYKUbyHH6QBqz59qUIvd9GeekRfKmavA090urMPQlr6EnxfQSWpBw+Kn2lXECA+WkurdFUvbbMw0onHqGpvfNt1G5MJBHXz/IRytEqc6zueQgVYNuPgUVN6OXR8i3BGpWE64BmMHfF/E1zK6DThidguQSvPMIVGzjHwCBQegHLYyVjtwxu+waaTv9Uu3O
FileManagerPlugin.SFTP.EnableCompression=False
Local File Backup Plugin
LocalFileBackupPlugin.Limits.MaxTotalSizeMB=20280
LocalFileBackupPlugin.Limits.MaxIndividualSizeMB=10140
LocalFileBackupPlugin.Limits.MaxBackupCount=28
LocalFileBackupPlugin.Limits.ReplacePolicy=DoNothing
LocalFileBackupPlugin.Limits.MaxDirectoryTraversalDepth=8
LocalFileBackupPlugin.Limits.Compression=Default
LocalFileBackupPlugin.Storage.StorePath=./Backups/
LocalFileBackupPlugin.Storage.OverrideOriginDirectory=False
LocalFileBackupPlugin.Storage.OriginDirectory=
LocalFileBackupPlugin.Storage.UseVDS=True
LocalFileBackupPlugin.Cloud.UseS3Storage=False
LocalFileBackupPlugin.Cloud.S3ServiceURL=
LocalFileBackupPlugin.Cloud.S3AuthenticationRegion=
LocalFileBackupPlugin.Cloud.S3BucketName=AMPBackups
LocalFileBackupPlugin.Cloud.S3AccessKey=
LocalFileBackupPlugin.Cloud.S3SecretKey=
LocalFileBackupPlugin.Cloud.S3UploadMode=UploadAllBackups
LocalFileBackupPlugin.Cloud.S3StorageClass=Standard
RCON Plugin
RCONPlugin.Server.ServerProtocol=SourceRcon
RCONPlugin.Server.ServerIPBinding=0.0.0.0
RCONPlugin.Server.ServerPort=7777
RCONPlugin.Server.EnableRCONPassthrough=False
RCONPlugin.Server.UseRCONSecureExtension=False
RCONPlugin.Server.RequireSecureConnection=False
RCONPlugin.Server.RCONSCertificatePath=
RCONPlugin.Server.RCONSCertificatePassword=
RCONPlugin.Server.RCONConformantMode=False
SteamCMD Plugin
steamcmdplugin.SteamWorkshop.WorkshopItemIDs=[]
steamcmdplugin.SteamUpdateSettings.AutomaticallyRetryOnFailure=False
steamcmdplugin.SteamUpdateSettings.AutomaticRetryLimit=5
steamcmdplugin.SteamUpdateSettings.UpdateCheckMethod=ByBuildID
steamcmdplugin.SteamUpdateSettings.SteamCMDBetaPassword=
steamcmdplugin.SteamUpdateSettings.ThrottleDownloadSpeed=0
steamcmdplugin.SteamUpdateSettings.KeepSteamCMDScripts=False
steamcmdplugin.SteamUpdateSettings.SteamUsername=
steamcmdplugin.SteamUpdateSettings.SteamPassword=
Web Request Plugin
WebRequestPlugin.WebhookLogins.PushbulletAccessToken=